Release testing instructions for WC Payments 2.8.0
Customer Multi-Currency allows a shop to allow their customers to choose which currency they'd like to use to see and pay for products.
- Go to
WooCommerce -> Home. You will see a generic inbox notification prompting the merchant to set up multi-currency. ClickingSet up nowwill redirect the merchant to WP Admin on the "Multi-Currency" tab on theWooCommerce > Settingspage. - On the settings page, click the
Add Currenciesbutton. A modal should appear. - Verify that the search box works as expected by searching for a currency and verifying that the currency list updates only the expected currency displays.
- Verify that all the flags are displaying correctly.
- Tick the
Danish Kroneoption in the currency list then clickUpdate selected. The UI should update and Danish Krone should now be in the list of enabled currencies. - Verify that currency code isn’t being duplicated in the modal and in the list.
- Click the bin icon to the right of Danish Krone. A modal should appear. Click
Remove Currency. Verify that Danish Krone gets removed from the list of enabled currencies. - Make sure there is no way to edit/delete the default currency.
As an admin:
- In WP Admin, click on
Appearance > Widgets. Verify you can see "Currency Switcher" in the list of available widgets. - Click on the currency switcher widget and add it to the sidebar of the site. Tick both the
Display currency symbolsandDisplay flagsoptions. - Go to Settings -> General and change the default currency of the store from USD to EUR.
- Go to Settings -> Multi-Currency. Check that the default currency is Euros, and the rates displayed for the other currencies are roughly in line with the current currency conversion rates between Euros and each currency.
- Go to Settings -> General and change the default currency of the store back to USD.
- Go back to the Settings -> Multi-Currency page and verify that USD is now the default currency, and the rates being displayed are now in line with the conversion rates between USD and each currency.
As a guest user:
- Go to the shop page on the site. Verify the currency switcher appears in the sidebar. Change the selected currency and verify that the page should reload and all items in the shop will now display in the selected currency.
- Test toggling the
Display currency symboloption and verify the currency symbol no longer displays in the currency switcher list. Do the same with theDisplay flagsoption. - Add some items to the cart and go to the cart page, click
Proceed to checkout, then clickPlace orderon the checkout page. Use a Stripe test card: 4242 4242 4242 4242, any cardholder name, valid expiration date and CVV will work. - Order should be completed correctly.
As a logged in user:
- Go to the
My Account -> Account Detailspage. Update the "Default currency" option, save changes. - Go to the shop page. Prices should be displayed in your selected currency.
- Add some items to the cart and go to the cart page, click
Proceed to checkout, then clickPlace orderon the checkout page. Use a Stripe test card: 4242 4242 4242 4242, any cardholder name, valid expiration date and CVV will work. - Order should be completed correctly.
- Add the currency switcher widget to the store as described in scenario 2.
- Go to WP Admin and click on the "Multi-Currency" tab on the
WooCommerce > Settingspage. Make a note of the exchange rates for the EUR, NZD and CDF currencies. - Go to the shop page on the store, switch between USD, EUR, NZD and CDF and verify that the prices all look right (are converted from their USD price at the appropriate rate) and are formatted accordingly:
-
USDshould look like$xx,xxx.xx -
EURshould look likexx.xxx,xx €- Modify the user's locale to
nl_NLand view the shop page - The formatting should be
€ xx.xxx,xx
- Modify the user's locale to
-
CDFshould look likexx,xxx.xx Fr -
NZDshould look like$xx,xx.xx
-
- Make sure that discounted prices and variation price ranges are rendered correctly.
Simple Products
- Make sure the price is converted in the Shop, Product, Cart and Checkout pages.
- Purchase the product and check that the order has the right currency and price
- Navigate to the My Account -> Orders page and ensure that the currency used was the selected one.
Variable Products
- Make sure the price is converted in the Shop, Product, Cart and Checkout pages.
- Modify the selected currency and ensure the price range was updated. It is cached by WooCommerce by default, but should be refreshed when the exchange rate changes.
- Purchase the product and check that the order has the right currency and price
- Navigate to the My Account -> Orders page and ensure that the currency used was the selected one.
Coupons
- Enable coupon codes in the General WooCommerce settings
- Create three coupons, one for each type
- Ensure that the fixed cart discount and fixed product discount amounts are converted when using them
- Ensure that the percentage discount works correctly and the percentage defined in the coupon is applied to the order
- Add a minimum and maximum spend usage restriction to a coupon, and check that those values are converted and matched against the cart subtotal
Shipping
- Add a free and a flat rate shipping method to your shipping zone
- Make sure that they work correctly on the checkout page
- If
apply_charm_only_to_productsis enabled, the shipping rate should only be ceiled after conversion - If it's not, the shipping rate should also have the charm pricing added to it
- Set a
Minimum order amountfor free shipping. Make sure that the minimum order amount is checked against the selected currency. For example:- If the minimum order amount is set to $100.
- $100 in the cart should give free shipping.
- Change the store currency to GBP.
- The amount needed to qualify for free shipping should now be £71 (because of the conversion rate between USD and GBP).
- Ensure that the order still qualifies for free shipping.
Taxes
- Enable taxes in the General WooCommerce settings and create a standard tax rate
- Ensure that taxes are correctly applied and converted when using both "Prices inclusive of tax" and "prices exclusive of tax"
- Ensure that the shipping methods' taxes are also converted properly under both configurations
Admin
- Create some orders (or use created one), but in between, change the user currency.
- Navigate to WooCommerce > Home and if you didn't complete the onboarding setup, complete them to reach the 'Orders/Stock/Reviews' activity cards.
- Check if the order totals show the correct currency symbols.
Compatibility with WC Subscriptions base flow
- Use a variable subscription product that has price differences between variations, and also a sign up fee for at least one variation.
- View product, and change currency.
- Confirm that from and sign up fee amounts are converted
- Select a variation and confirm price string below variation selection is converted.
Switching (upgrade/downgrade)
- Go to WooCommerce > Settings > Subscriptions and enable switching, also setting to prorate recurring payment for upgrades and downgrades.
- Use or set up a variable sub product that has at least 2 variations with different prices, such as 10/month and 20/month.
- Sign up for the lower price.
- Once order is complete, scroll down to use the View option to view the subscription.
- Use the Upgrade or Downgrade button on the subscription to start the process.
- Choose the higher priced variation on the product and add to cart.
- The cart should show the sign up fee as the proper prorated amount to upgrade.
Early Renewal Payments
- Go to WooCommerce > Settings > Subscriptions and enable Accept Early Renewal Payments.
- Purchase a subscription, or use existing one.
- Go to My Account > Subscriptions, then View a subscription.
- Click Renew now.
- The cost of the subscription should be the same, meaning not double converted.
Resubscription scenario
- Purchase a subscription.
- Go to WooCommerce > Subscriptions in the admin.
- Hover the new subscription and click Cancel, once the page refreshes hover again and choose Cancel Now.
- Navigate to My Account > Subscriptions, and then click View for the cancelled subscription.
- Click the Resubscribe button, and the subscription added to the cart will have the correct price.
Manual subscription renewals
- Create a subscription product and sign up, if not already done.
- Go to WooCommerce > Subscriptions, and click into a subscription.
- Use Subscription actions at the top right to Create pending renewal order and click the arrow button.
- Navigate to the new order through the link in the Order notes.
- The order will have a _Customer payment page _link above the Status, click that link.
- The checkout page will have the correct price listed.
- Shipping costs and taxes should still convert correctly.
- All other products in the shop should still convert correctly.
- You should be able to add a simple product to the cart with the proper conversion.
Process renewal
- If you do not have an existing subscription, create a product and purchase it.
- Go to WooCommerce > Subscriptions, and click on the subscription.
- Choose Process renewal from Subscription actions at the top right, and click the arrow button.
- This will create a renewal order, which will be linked in the Subscription notes. Click to go to that order.
- Note for payment will show the correct amount, and the correct currency symbol.
Shipping and taxes
- Add a free and a flat rate shipping method to the default shipping zone
- Add a free and a flat rate shipping method to a user-defined shipping zone
- Apply some advanced costs to the flat rate methods
- Assert that the shipping methods work correctly on the checkout page with simple products
- Set a Minimum order amount for free shipping and assert that the minimum order amount is checked against the selected currency
- Enable taxes and check that the taxes are calculated using the converted price
- Test Subscriptions compatibility with:
- Single subscription product in the cart
- Two subscription products with different renew periods
Recurring Product % Discount coupon
- Make sure you have Early Renewals enabled under WooCommerce > Settings > Subscriptions.
- Create a Recurring Product % Discount coupon.
- Add the subscription product to your cart along with the coupon.
- Confirm that the amount discounted in the cart has only been converted once.
- Complete the transaction.
- Go to My Account > Subscriptions, and then that subscription.
- Click Renew now, and confirm the amount in the cart has not been converted a second time.
Recurring Product Discount coupon
-
Make sure you have Early Renewals enabled under WooCommerce > Settings > Subscriptions.
-
Create a Recurring Product Discount coupon that is less than the amount of the product you're going to use for testing.
-
Purchase the subscription product with the coupon.
-
Go to My Account > Subscriptions, and then that subscription.
-
Click Renew now, and you will see the coupon amount has not been converted again.
Secondary test
-
Navigate to WooCommerce > Subscriptions in the admin.
-
Select the subscription from above.
-
Under Subscriptions actions in the top, right corner, select Create pending renewal order and then click the little arrow or Update.
-
A new order will be created, and a link to it will be in the Subscription notes, click the link to go to that order.
-
There will be a Customer payment page link above the Status select box, click that.
-
Verify that the coupon amount has not been converted a second time.
Preview
- Navigate to WooCommerce > Settings > Multi-Currency
- If no additional currencies are enabled, use the Add Currencies button to add one.
- Click on the pencil to edit the currency.
- Update values on the settings page to trigger the preview field to update.
- On the Preview section, you'll see that the amount has a valid format.
- Try with non-numeric amounts, price rounding, charm pricing, manual exchange, thousands, decimals, zero-decimal currencies.
Zero decimal currency
Decimal currency
- Add a new decimal currency
- Open the shop, cart, checkout, and check that the items have decimal places
Zero-decimal currency
- Add a new zero-decimal currency (e.g. CZK)
- Open the shop, cart, checkout and check that the items don't have any decimal places
Default values
- Navigate to WooCommerce > Settings > Multi-Currency
- Add a new currency if one is not enabled.
- Edit an enabled currency and update all of the settings:
- Exchange rate: manual rate
- Manual rate: 2
- Price rounding: 10.00
- Price charm: -0.05
- Go back to the currencies page and delete the currency.
- Add the currency back and confirm the default settings have been restored.
- Exchange rate: Fetch rate automatically
- Price rounding: 1.00 (recommended)
- Price charm (None)
Last updated
- Go to Settings -> Multi-Currency and add a few currencies (e.g. EUR, GBP, CAD, VND) to the enabled currencies list using the Add Currencies modal. (If you have already got a few enabled currencies, skip this step).
- Go to Settings -> General and change your default store currency to force the cache to be cleared.
- Go back to Settings -> Multi-Currency and click 'Edit Currency' on one of the currencies. Check the value of the "last updated" time and verify that it matches the current time (in UTC).
- Wait a few minutes, then go back to Settings -> General and change the default store currency again.
- Go back to Settings -> Multi-Currency and click 'Edit Currency' on one of the currencies. Check the value of the "last updated" time and verify that it was updated since the last time you checked and that it matches the current time (in UTC).
- Navigate to WooCommerce > Settings > Multi-Currency.
- Add one or more additional currencies.
- Edit the additional currencies and update them to have manual rates, and save.
- Navigate to WooCommerce > Settings > General.
- Update the store currency and save.
- Notice should appear.
- Install the WooCommerce Blocks plugin
- Add two new pages with the Cart and Checkout blocks
- Follow the customer-facing prices test instructions described in the Test Scenario 3
- Make sure any pages in the admin and products quick-edit still show the prices in the default store currency
- Navigate to WooCommerce > Settings > Multi-currency, toggle
Add a currency switcher to the Storefront theme on breadcrumb section. Check that the widget got included (or not) on the breadcrumb section of the store. Please note it gets added to the breadcrumb section of WooCommerce pages (shop, category, product etc). - Check that it works with different Storefront themes. Please note that the country flag is not shown.
- The widget shouldn't be included on themes not based on Storefront or those without the breadcrumb section.
- Make a few orders in your store using multi-currency in a few different currencies, and a few using the store default currency (to test that these amounts do not get converted). In order to test all areas of the analytics, I would recommend ordering the following:
- A few different products
- Belonging to different product categories
- Some orders using discount coupons and some without
- Some variations of the same product
- Some orders with taxes and shipping applied.
- Go to the different sections of the analytics reporting (Overview, Products, Revenue, Orders, Variations, Categories, Coupons, Taxes, Downloads, Stock) and look at the report results. Verify that the results look sensible, that they contain the orders you have made, and importantly the amounts should be all converted into your store's default currency. In the case of orders made using the store currency, they should just use the order amount. In the case of multi-currency orders, they should use the order amount, converted back into the store currency using the exchange rate at the time of transaction.
- Check the other areas of the analytics interface to make sure there are no errors and the data makes sense This could include: changing the report type/report filters, changing the chart type/chart display options, searching the table, downloading a CSV, hiding/showing columns on the table).
Automatic Currency Switching via Geolocation
- Set your store currency to USD.
- Under WooCommerce > Settings > Multi-Currency enable your local currency as an option.
- While under Multi-Currency, also enable Automatically switch customers to their local currency if it is enabled above.
- Open your store in a private/incognito window, and the currency should automatically be set to your country's currency.
Geolocation Automatic Currency Switch Notice
- Log in to a WC user
- Remove the user currency with
npm run wp user meta delete <user_id> wcpay_currency - Navigate to the shop page
- Assert that the notice appears informing that the currency was switched automatically
- Assert that the notice can be dismissed and that it doesn't appear again while navigating
- Remove the user currency with
- Repeat these steps for a guest user, removing the WooCommerce session cookie, if present
- Set the store current to the same as the geolocated country, or use the
woocommerce_geolocate_ipfilter to mock your country- Assert that the note does not appear if the geolocation currency is the same as the store currency
- Navigate to the Multi-Currency settings page and click on the Add currencies button
- Assert that only Stripe presentment currencies that are also part of the WooCommerce currencies list are available in the modal (BTC should not show up)
- Use the
wcpay_multi_currency_available_currenciesfilter to add BTC to the currencies list - Navigate to the Multi-Currency settings page and click on the Add currencies button
- Assert that BTC is available the modal
- Add an item to the cart, navigate to the checkout page and make sure WC Pay is not available
Pre-requisite info
Please note that currencies that are different than the store currency should use the store currency number formatting. Check the match of the decimal sep, thousand sep, and the decimal points (only unless it's a zero decimal point currency like JPY)
For example, if the store currency is USD, the formats are like $1,000.00. The same should be for EUR: like €1,000.00.
What the customer sees (Shop, Cart, Checkout, etc) should always be formatted using the local currency format.
Short format
- Assert analytics is shown in short format uses the store currency
- Check non-total amounts are displayed in short format when the amounts are displayed alongside totals.
- Check short format is displayed for non-total amounts in a table.
Explicit format
- Check explicit format is displayed when there is a form of a currency conversion
- Check explicit format is displayed for total amounts
- Check explicit format is displayed for total amounts in a table
- Check explicit format when showing amounts in a button
- Check explicit format when showing amounts in a sentence
- Check explicit format is shown when the store currency is displayed in a list with non-store currencies
- Orders section in WooCommerce -> Home
- Total in the orders table in WooCommerce -> Orders
The feature consists on providing merchants an early access to the UPE checkout.
They can enable/disable the feature, which allows to enable/disable the UPE checkout flow.
Merchants can opt-in to get early access to UPE checkout by either:
- WooCommerce > Home > "Boost your sales by accepting new payment methods" inbox notice
- WooCommerce > Home, "Things to do next" > "Boost your sales by accepting new payment methods" onboarding task
- WooCommerce > Settings > Payments > WCPay > "Payments accepted on checkout" section
PLEASE NOTE: enabling/disabling UPE via the WCPay Dev tool (or manually via wp_options) could cause some issues where the settings might not save due to invalid payment methods added. We recommend using the UI to enable UPE in order to have the best consistent state.
PLEASE NOTE: the card fees might keep saying "missing fees" until https://github.com/Automattic/woocommerce-payments/issues/2521 is completed
- Displays in 2 different ways when UPE is enabled/disabled
- On first installation, it allows to enable UPE through the "Enable in your store" CTA, which redirects to the onboarding step
- Once UPE is enabled
- The checkout experience is updated with the selected payment methods (see "Test UPE" section of the testing instructions)
- Merchant can add payment methods via the "Add payment methods" button
- The payment methods in the modal show the correct fees
- Merchant can remove payment methods via the "trash" icon on each payment method
- At least one payment method needs to be enabled in order for the trash icon to be present
- After a payment method has been added/removed, settings need to be saved
- Merchant can leave feedback via survey or can disable UPE via hamburger menu at the top right of the section
- Feel free to submit the survey with "test" in the comments
- Disabling UPE allows merchant to also leave feedback
- Feel free to submit the survey with "test" in the comments
- Disabling UPE removes all the non-UPE payment methods, only leaving "card" enabled
- Disabling UPE restores the checkout experience
- Disabling UPE allows to re-enable it via the "Enable in your store" CTA
- It is present on new installation or on upgrade
- It does not display if the merchant enabled UPE checkout
- Clicking "Enable on your store" enables UPE and redirects to the second step of the onboarding task
- It is marked as "completed" when the merchant has reached the third step and UPE has been enabled
- If UPE is enabled > disabled again, task is marked as not completed, and starts from step 1
- When opened:
- It goes to the first step if UPE has not been enabled yet (either through settings or through inbox notice)
- It goes to the second step if UPE has been enabled (either through settings or through inbox notice) or the merchant has already completed the task
- It never goes directly to the third step
- The second step pre-selects all the available EU payment methods
- The payment methods show the correct fees
- On the second step, if a payment method has been un-selected (but it was added before), it is removed from checkout
- It allows to complete the second step only when at least one payment method has been selected
All of the following scenarios are to test the new UPE from Stripe. All of the tests will require UPE to be enabled. The easiest way to do this is with the WCPay Dev plugin. Visit the WCPay dev plugin page and check the Enable UPE checkout option and submit. Alternatively, in the database, add _wcpay_feature_upe with a value of 1, to the wp_options table. In addition to having UPE enabled, the tests require at least one regular product and one subscription product in the store.
Regular Checkout
- Add regular product to cart and go to checkout as a guest.
- Confirm that UPE fields are displayed.
- Attempt submitting with missing credit card fields and confirm errors are displayed.
- Attempt to submit with invalid credit card fields and confirm errors are displayed.
- Provide complete and accurate credit card fields and checkout.
- Confirm order complete page is shown.
- In the admin area, under WooCommerce > Orders, confirm that the latest order was created successfully.
- Under transactions, confirm that the transaction details are recorded successfully.
Saved Payment Method
- Add regular item to cart and go to checkout as a logged in user.
- Confirm that UPE fields are displayed.
- Provide complete and accurate credit card fields.
- Check the save payment method option and checkout.
- Confirm order complete page is shown.
- In the admin area, under WooCommerce > Orders, confirm that the latest order was created successfully.
- Under transactions, confirm that the transaction details are recorded successfully. (There is a known issue here that customer data is not recorded.)
- Back as a customer, add another item to cart and go to checkout to confirm that the saved payment method is displayed.
- Confirm you can successfully checkout with that saved payment method.
Pay for Order Flow
- Create an order from WooCommerce > Orders > New Order. Or change an existing order to 'Pending Payment'
- Click on 'Customer Payment Page', You should see UPE form.
- Note: There is a bug here, not related to UPE that always show the form, even when 'Use a new payment method' is not selected.
- Select 'Use a new payment method', fill the form but do not fill some of the inputs.
- Click on 'Pay for Order', check that you see the errors displayed.
- Fill out the form, check the box 'Save payment information to my account for future purchases.', click on 'Pay for Order', verify the order is placed.
- Check that the payment method has been saved, for example from My Account > Payment Methods.
- Set the order again to Pending Payment and test with a card that requires confirmation (4000002500003155).
- Test without saving the payment method.
Subscription with UPE
- Install and enable the Subscriptions plugin.
- Create a subscription product.
- Add the subscription product to the cart and continue with checkout.
- Checkout and confirm the subscription was successfully processed in the admin area.
- Confirm that the subscription was processed successfully from the customer's My Account > Subscriptions area.
- Check ability to renew now on subscription.
- Change renewal date to be sooner if desired (min of 1 hour ahead) and confirm subscription automatically renews.
Manage Payment Methods
- As a logged in user, go to My Account > Manage Payments > Add Payment Method
- Select WooCommerce Payments, verify UPE iFrame is displayed
- Enter all the fields, click on Add Payment Method.
- Check that you are redirected to Manage Payments, there is a notice indicating the Payment Method was added and that you see it on the list.
- Check that you can checkout using the newly saved payment method.
- Go back to Manage Payment Methods, check that you can set the payment method as default and delete it.
Giropay Checkout
- Change store currency to Euros
- Add Giropay payment method from WooCommerce > Settings > Payments > Payment Methods
- Add a regular product to cart
- Go to checkout, confirm UPE fields are displayed with option to select Giropay.
- Select Giropay and checkout
- Approve the transaction from the Stripe test page
- Confirm order complete page is shown.
- In the admin area, under WooCommerce > Orders, confirm that the latest order was created successfully.
- Under transactions, confirm that the transaction details are recorded successfully.
Sofort Checkout
- Change store currency to Euros
- Add Sofort payment method from WooCommerce > Settings > Payments > Payment Methods
- Add a regular product to cart
- Go to checkout, confirm UPE fields are displayed with option to select Sofort.
- Select Sofort and a valid country and checkout
- Approve the transaction from the Stripe test page
- Confirm order complete page is shown.
- In the admin area, under WooCommerce > Orders, confirm that the latest order was created successfully.
- Under transactions, confirm that the transaction details are recorded successfully.
Ensure Payment Request Buttons are hidden when there are unsupported items in the cart
Note: This test requires the Advanced Shipping Packages plugin. You'll find instructions on how to install it in the WooCommerce Payments v2.8.0 call for testing.
There are several steps to performing this test:
- Create 2 different shipping methods
- Create 2 different shipping classes
- Create 2 different shipping packages
- Assign shipping classes to 2 distinct products
- Ensure Payment Request Buttons are hidden under the right conditions
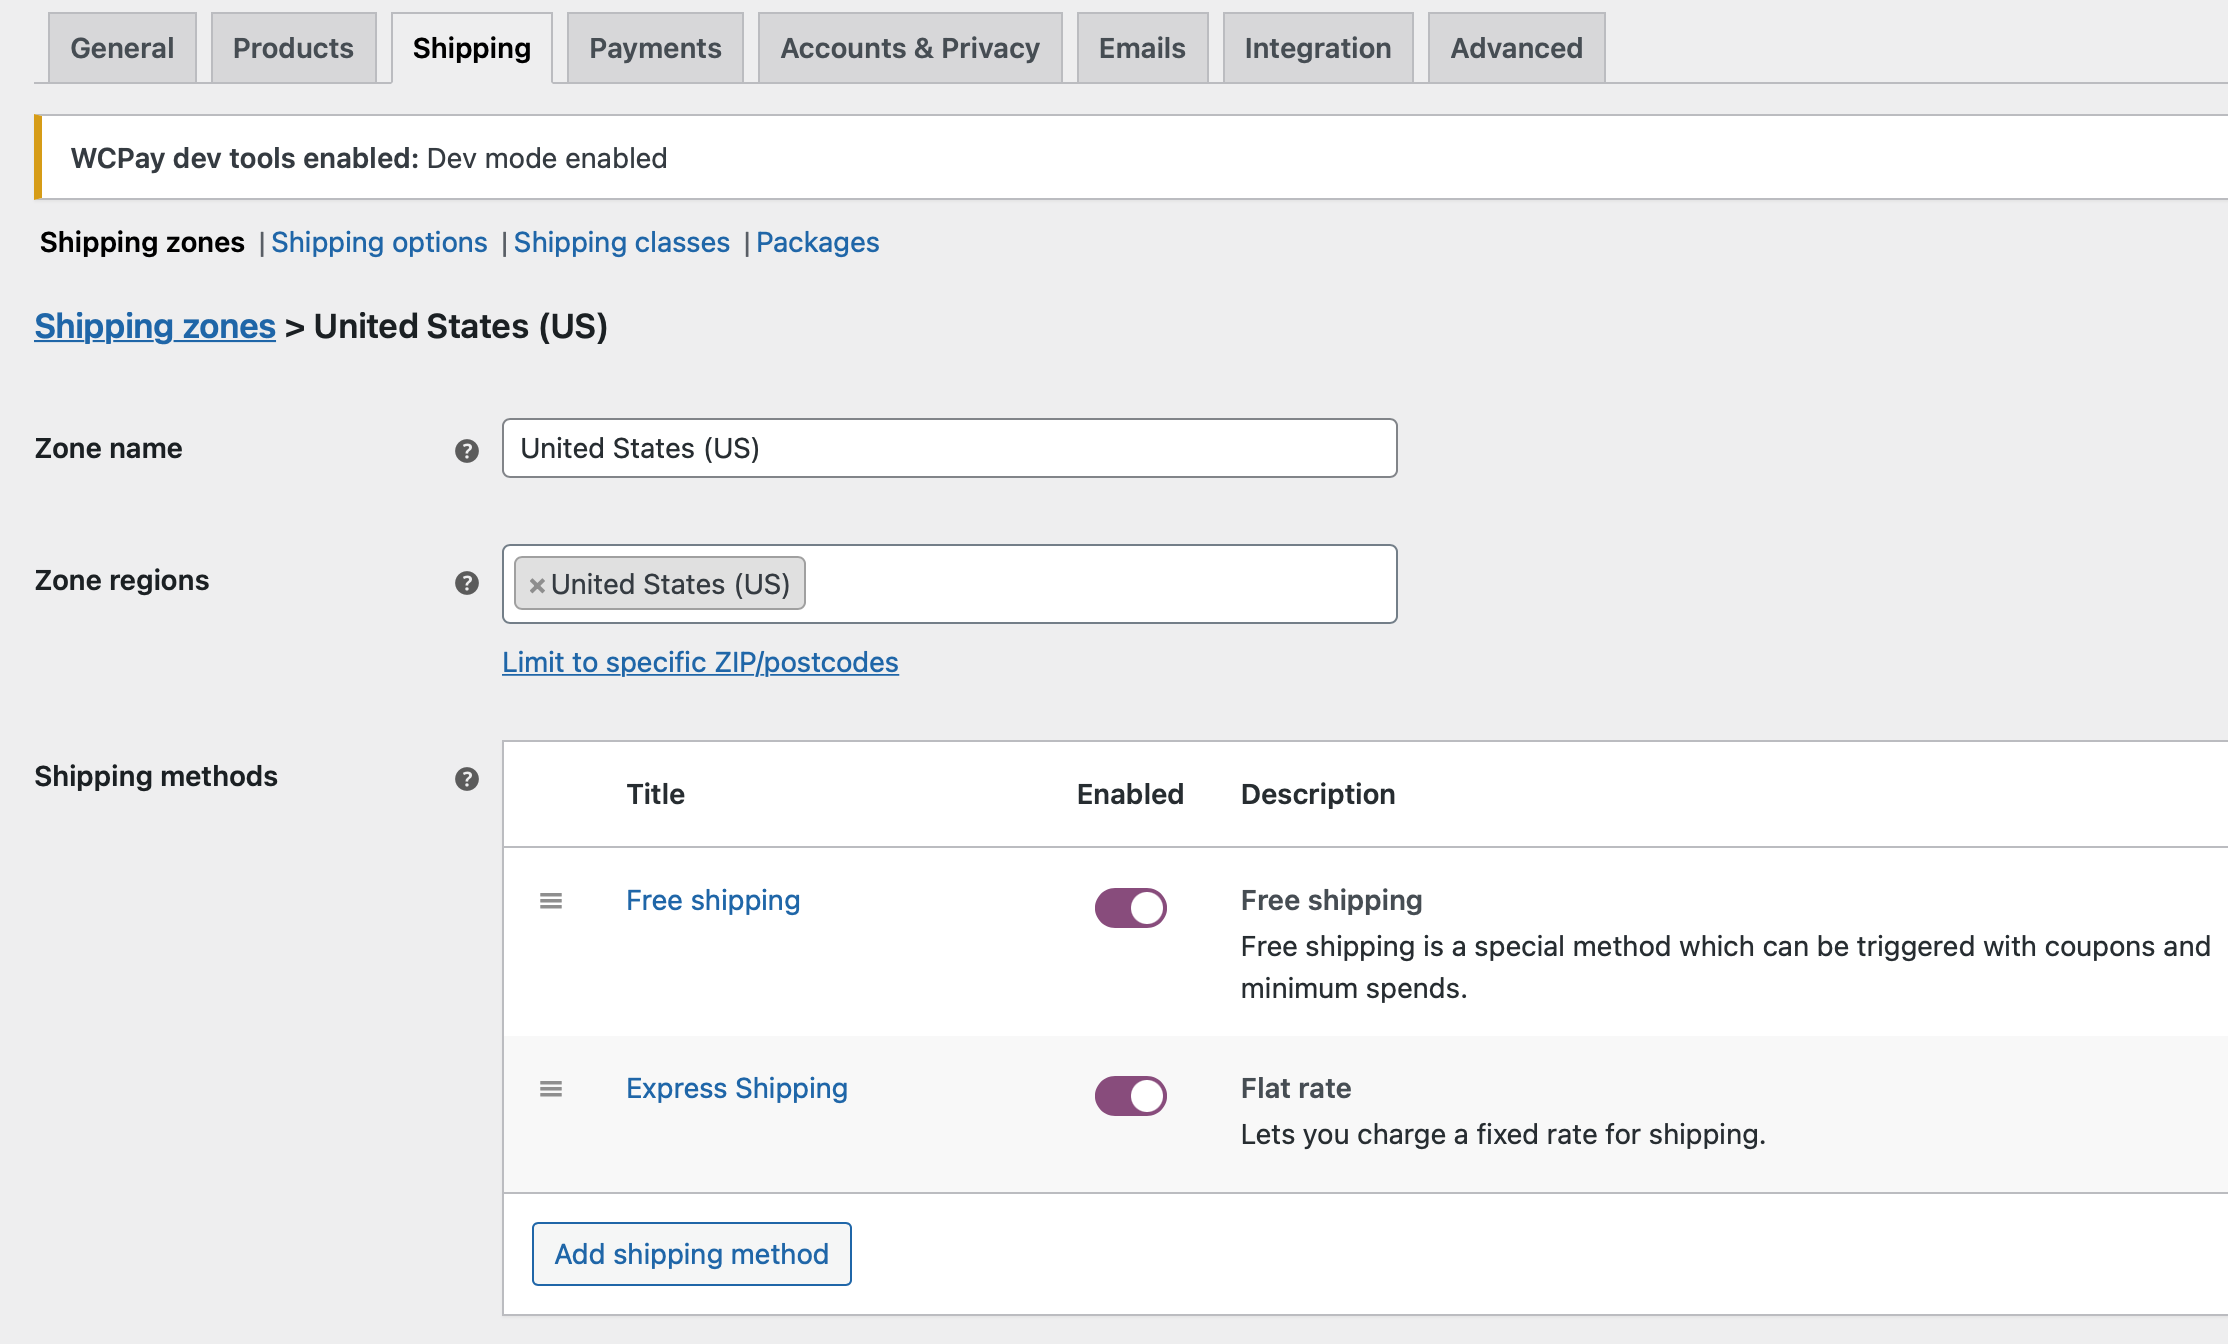
- Navigate to WooCommerce > Settings > Shipping.
- Create a new Shipping Zone if one does not exist, otherwise modify a shipping zone that already exists.
- Click the Add shipping method button and create a Free shipping shipping method.
- Click the Add shipping method button and create a Flat rate shipping method. The rate can be any value greater than 0.
Example result:
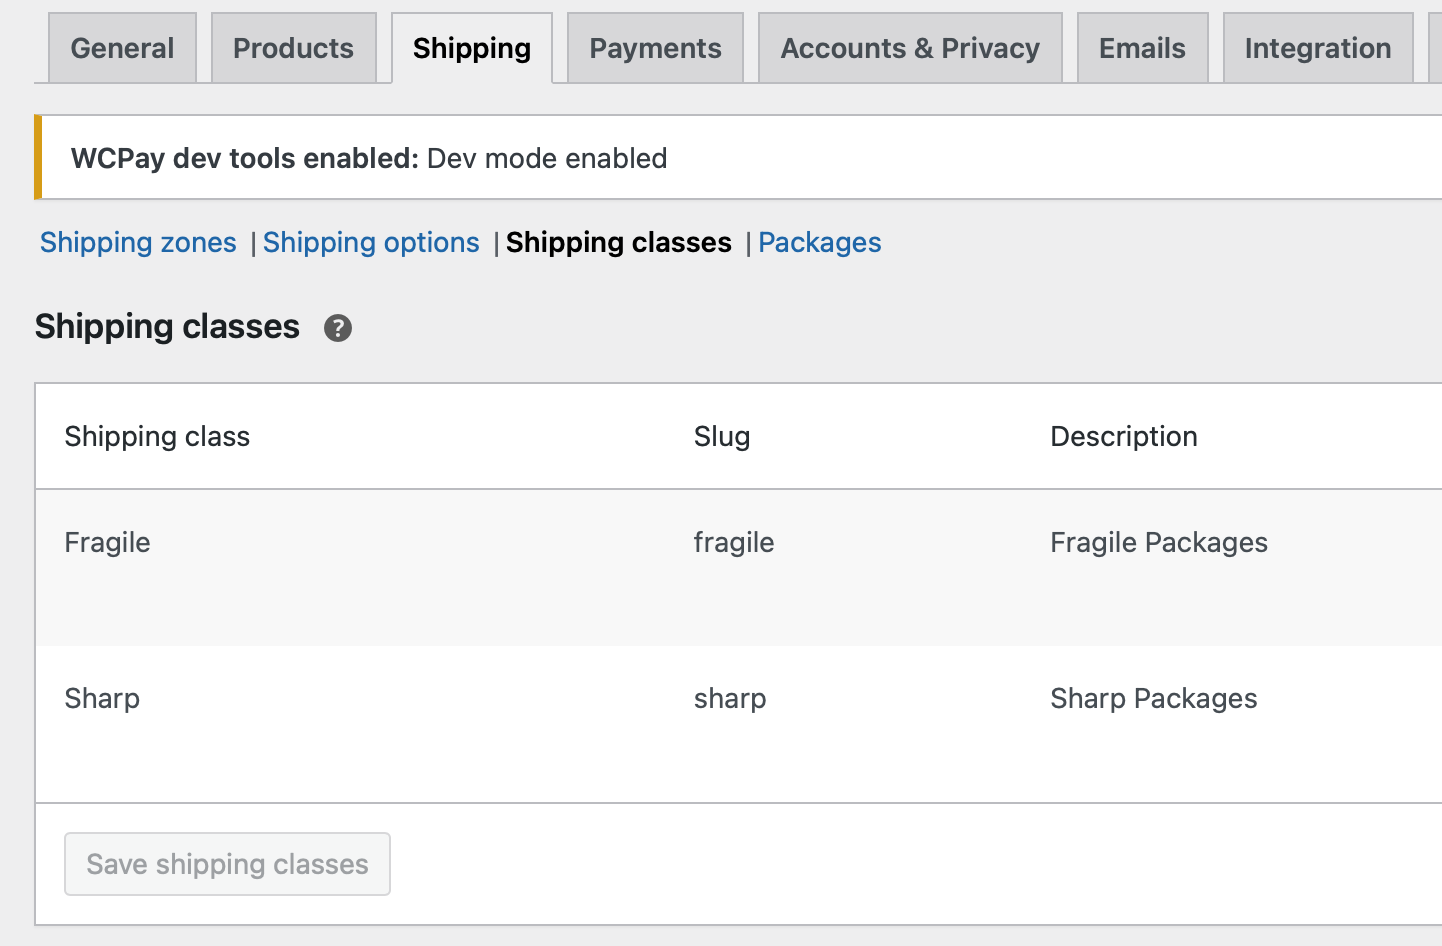
- Navigate to WooCommerce > Settings > Shipping > Shipping Classes.
- Click Add shipping class.
- Choose any name, slug, and description.
- Add another shipping class by repeating steps 2 and 3.
- Click Save shipping classes.
Example result:
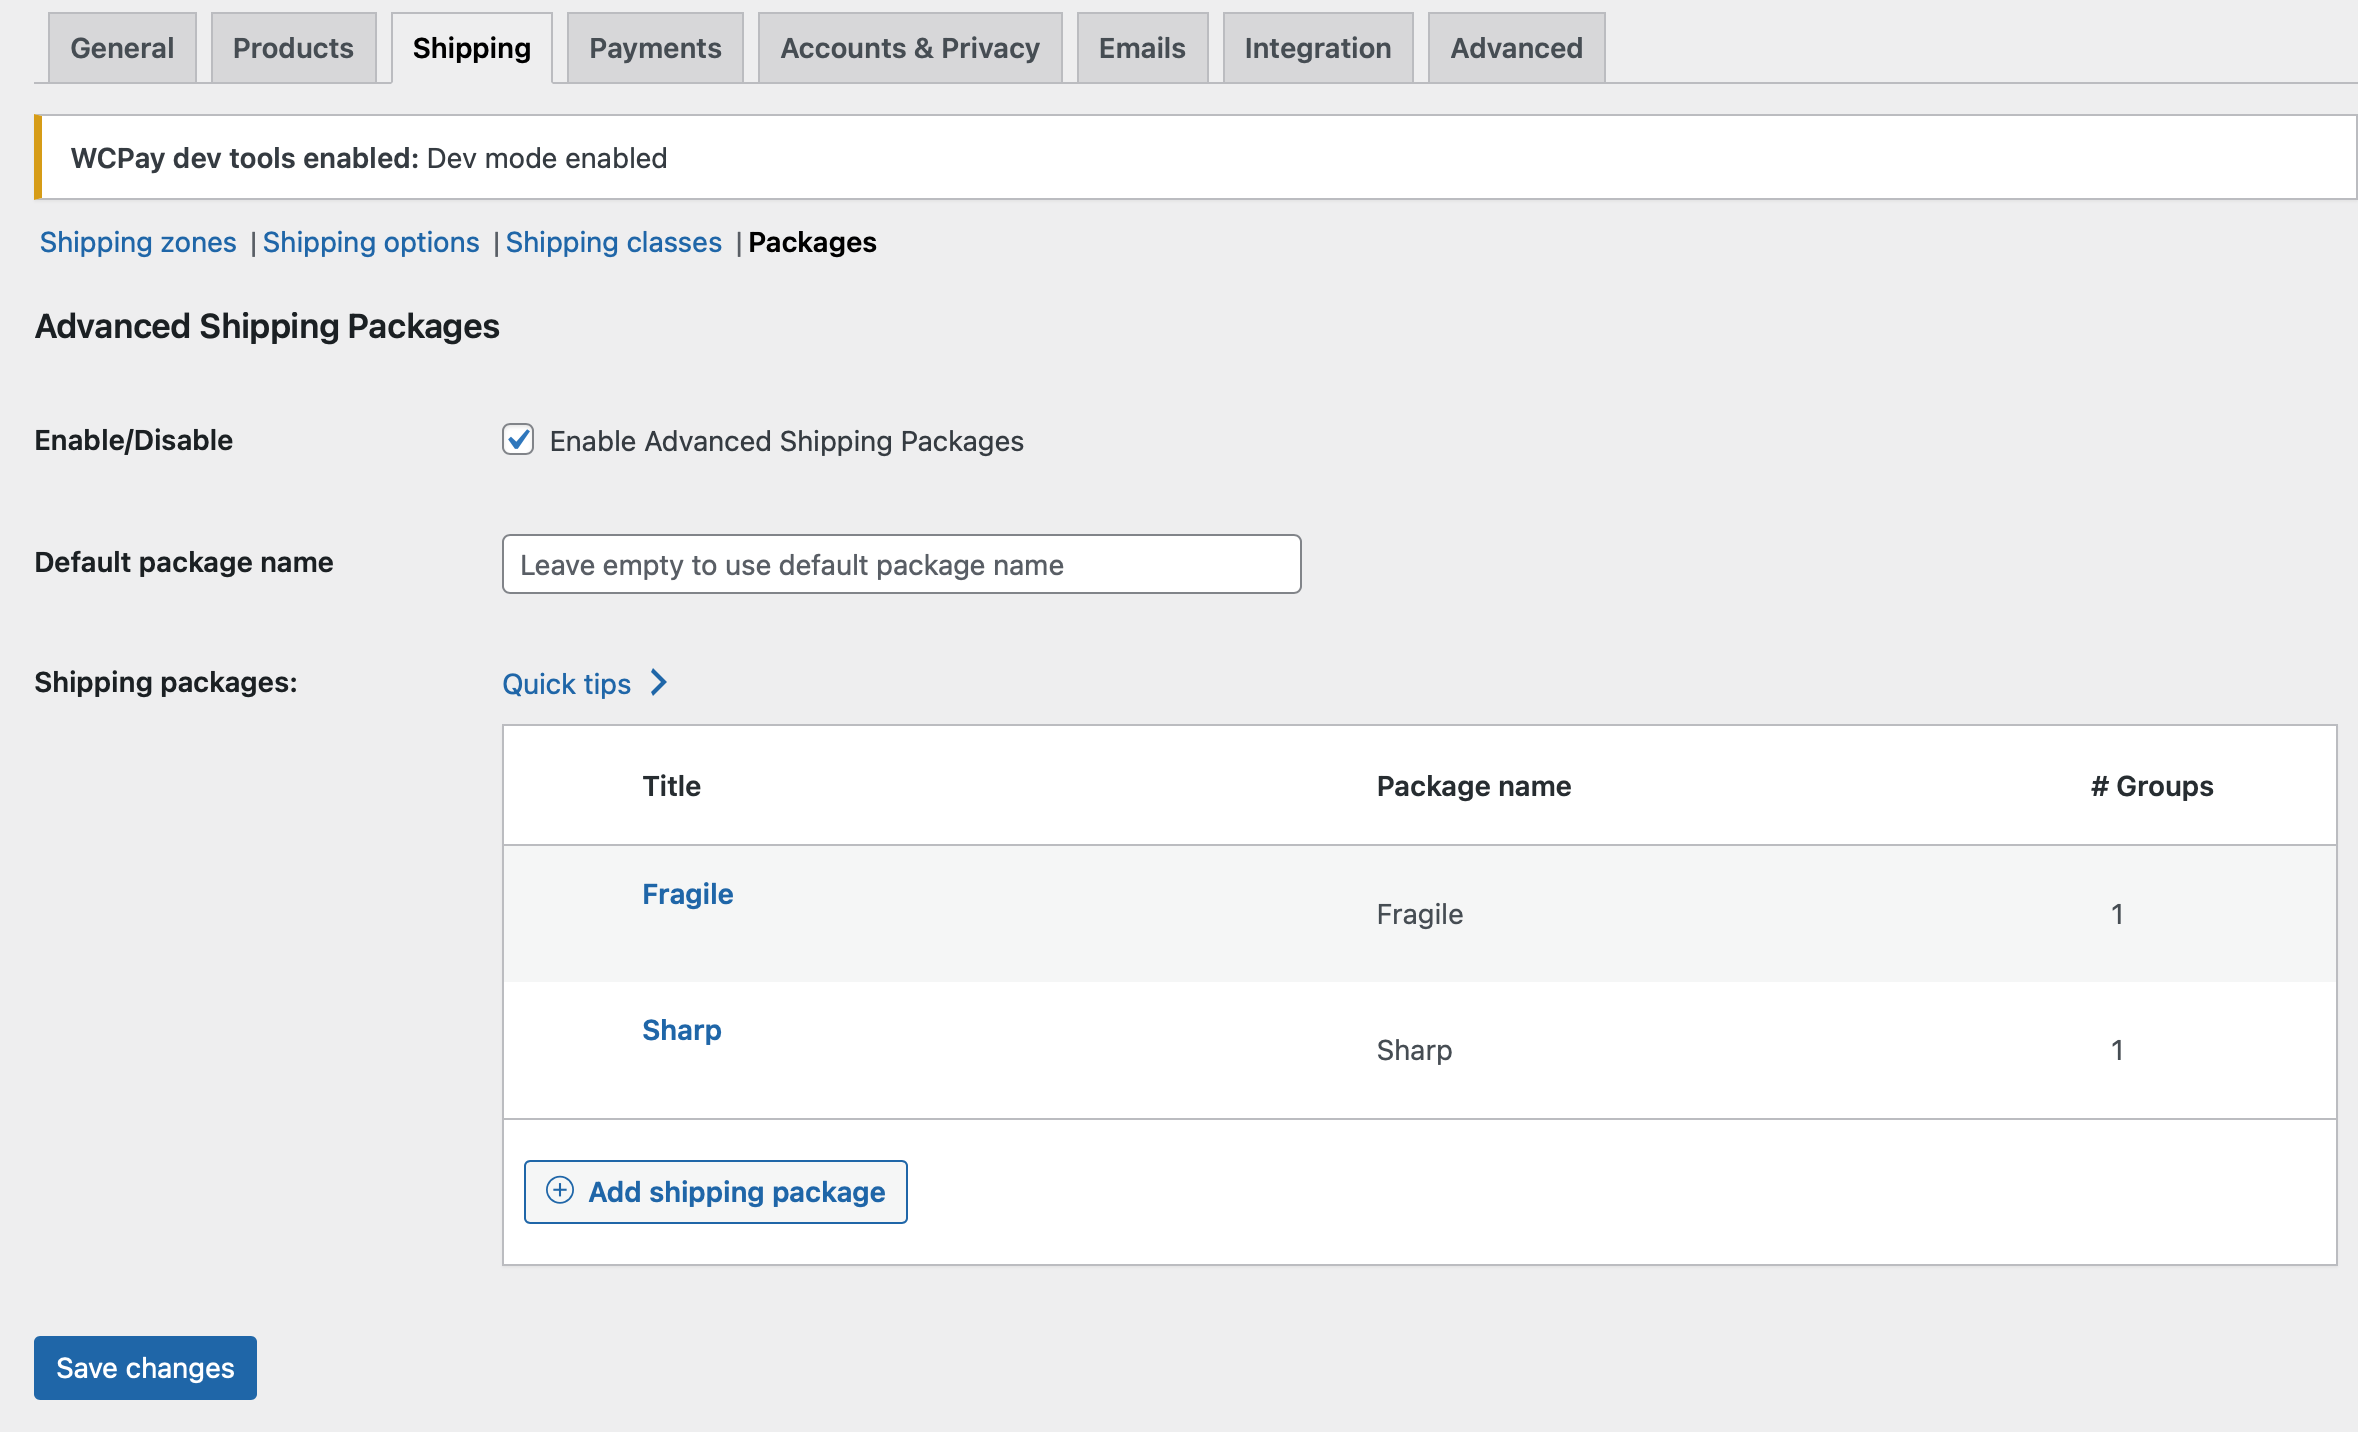
- Navigate to WooCommerce > Settings > Shipping > Packages.
- Click Add shipping package.
- Fill in the title with any value.
- Add a Shipping package condition where [Contains shipping class] [Equal to] [<shipping_class>]
- Fill in the Package name with any value.
- Add a Shipping package settings & content condition where [Shipping class] [Equal to] [<shipping_class>]. Make sure the value of
<shipping_class>here is the same as in the previous condition. - Click Publish.
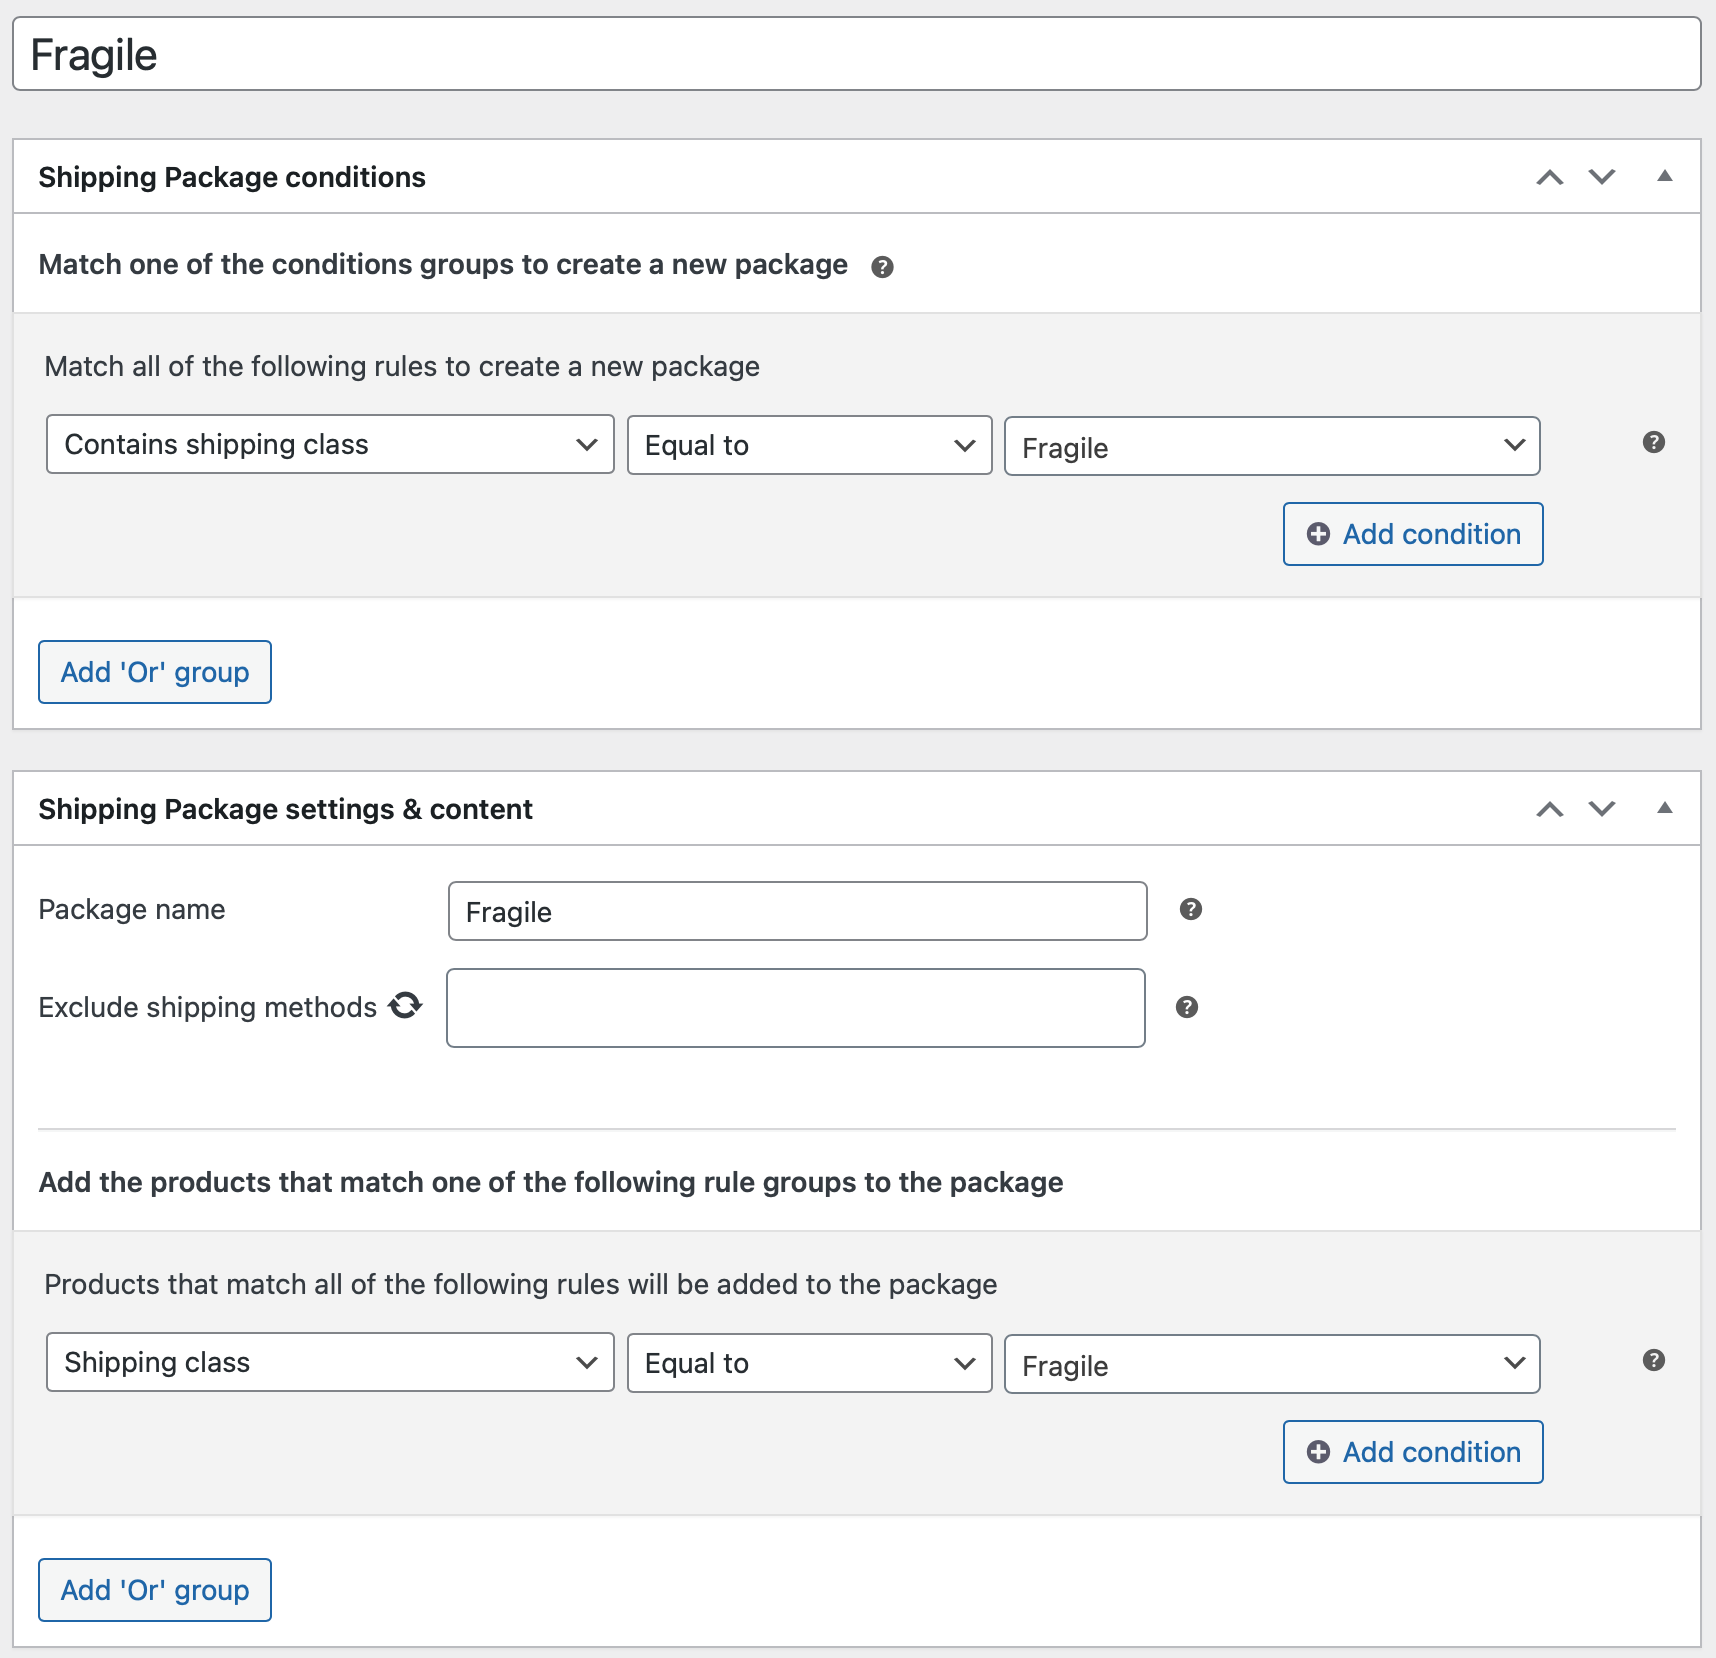
- Now repeat the process and create a second shipping package, but make sure you use a different value for
<shipping_class>.
Example result:
- Navigate to Products > All Products.
- Choose 2 different products (e.g. Beanie and Sunglasses)
- Assign each product a different shipping class (you'll find this under Product Details > Shipping)

- Click Update after you've assigned a product its shipping class.
Ensure Payment Request Buttons are hidden under the right conditions
- Add both products with the shipping classes you just created to the cart.
- Navigate to the Cart page.
- Make sure that no PRBs are visible.
- Navigate to the product page of one of the products with one of the shipping classes you created.
- Make sure that the PRB is visible.
- Remove 1 of the items from the cart.
- Reload the product page you're currently on.
- Make sure the PRB is visible.
- Navigate to the cart page.
- Make sure the PRB is visible.
- Remove the last item from the cart.
- Add 1 or more items to the cart that you did not associate with a shipping package.
- Navigate the cart page.
- Make sure the PRB is visible.