Release testing instructions for WC Payments 5.1.0
We added a new setting in Payments > Settings page, in the Advanced section, named Enable public key encryption, which is encryption the public_secret exposed in the network request made to our server.
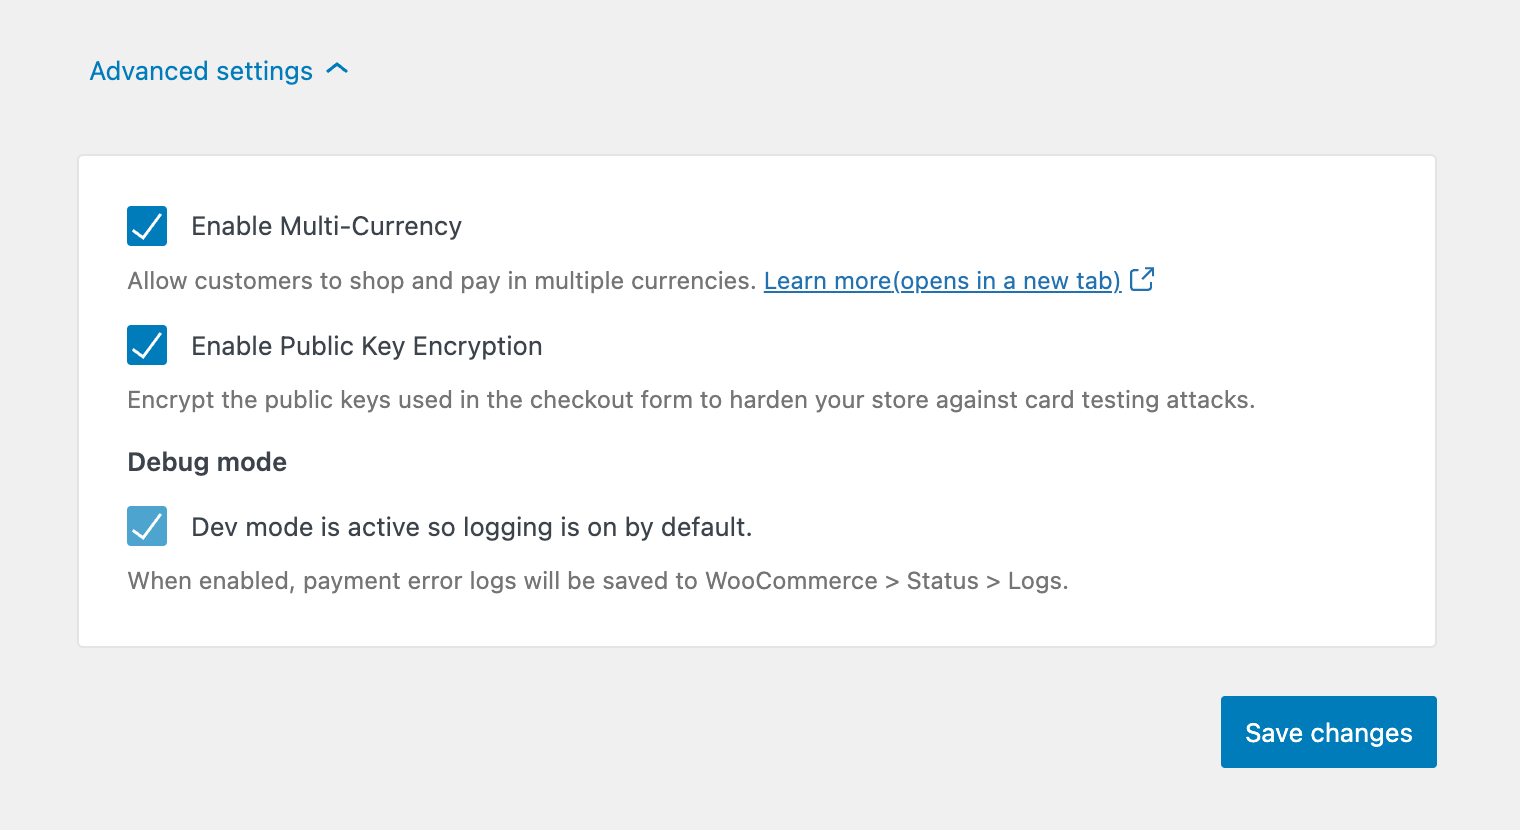
Run these tests with the setting enabled, and check if the checkout works as expected.
Note: No need to test this every time, just seeing this once will be enough before activating the toggle
- Open network tab on chrome developer tools before you switch to the Checkout page.
- Switch to checkout page
- On the response to the
wc-ajax=wcpay_create_payment_intentorwc-ajax=wcpay_create_setup_intentcalls, you should see adata.client_secretkey with this pattern:pi_xxx_secret_yyy
- The
data.client_secretshould be seen as encrypted.
- Checkout with normal credit card
- Blocks: Checkout with normal credit card
- UPE - Regular Checkout
- UPE - Manage Payment Methods
- UPE - Checkout with blocks
- Renew subscription
We have been working on a set of improvements to the authorization and capture workflow. These improvements were hidden behind a feature flag in previous versions. In this version, the feature flag will be enabled by default, making the feature available for all merchants that install it and enable the setting "Issue an authorization on checkout, and capture later".
These improvements include:
- Add an
Uncapturedtab in the Transactions page. This new tab includes a list of uncaptured transactions. - Ability to capture a transaction from the same table, by clicking on 'Capture' button available in every row.
- Ability to capture a transactions from the payment details summary, by clicking on 'Capture' button available.
- Inform the merchant about transactions pending to be captured, showing a counter in the side menu and the Uncaptured tab and displaying a message in the payment details screen.
Please find below the instructions to test these improvements.
- Navigate to
WP Admin > Paymentsand enable the settingIssue an authorization on checkout, and capture later(you'll find it at the bottom of the page). - Navigate to
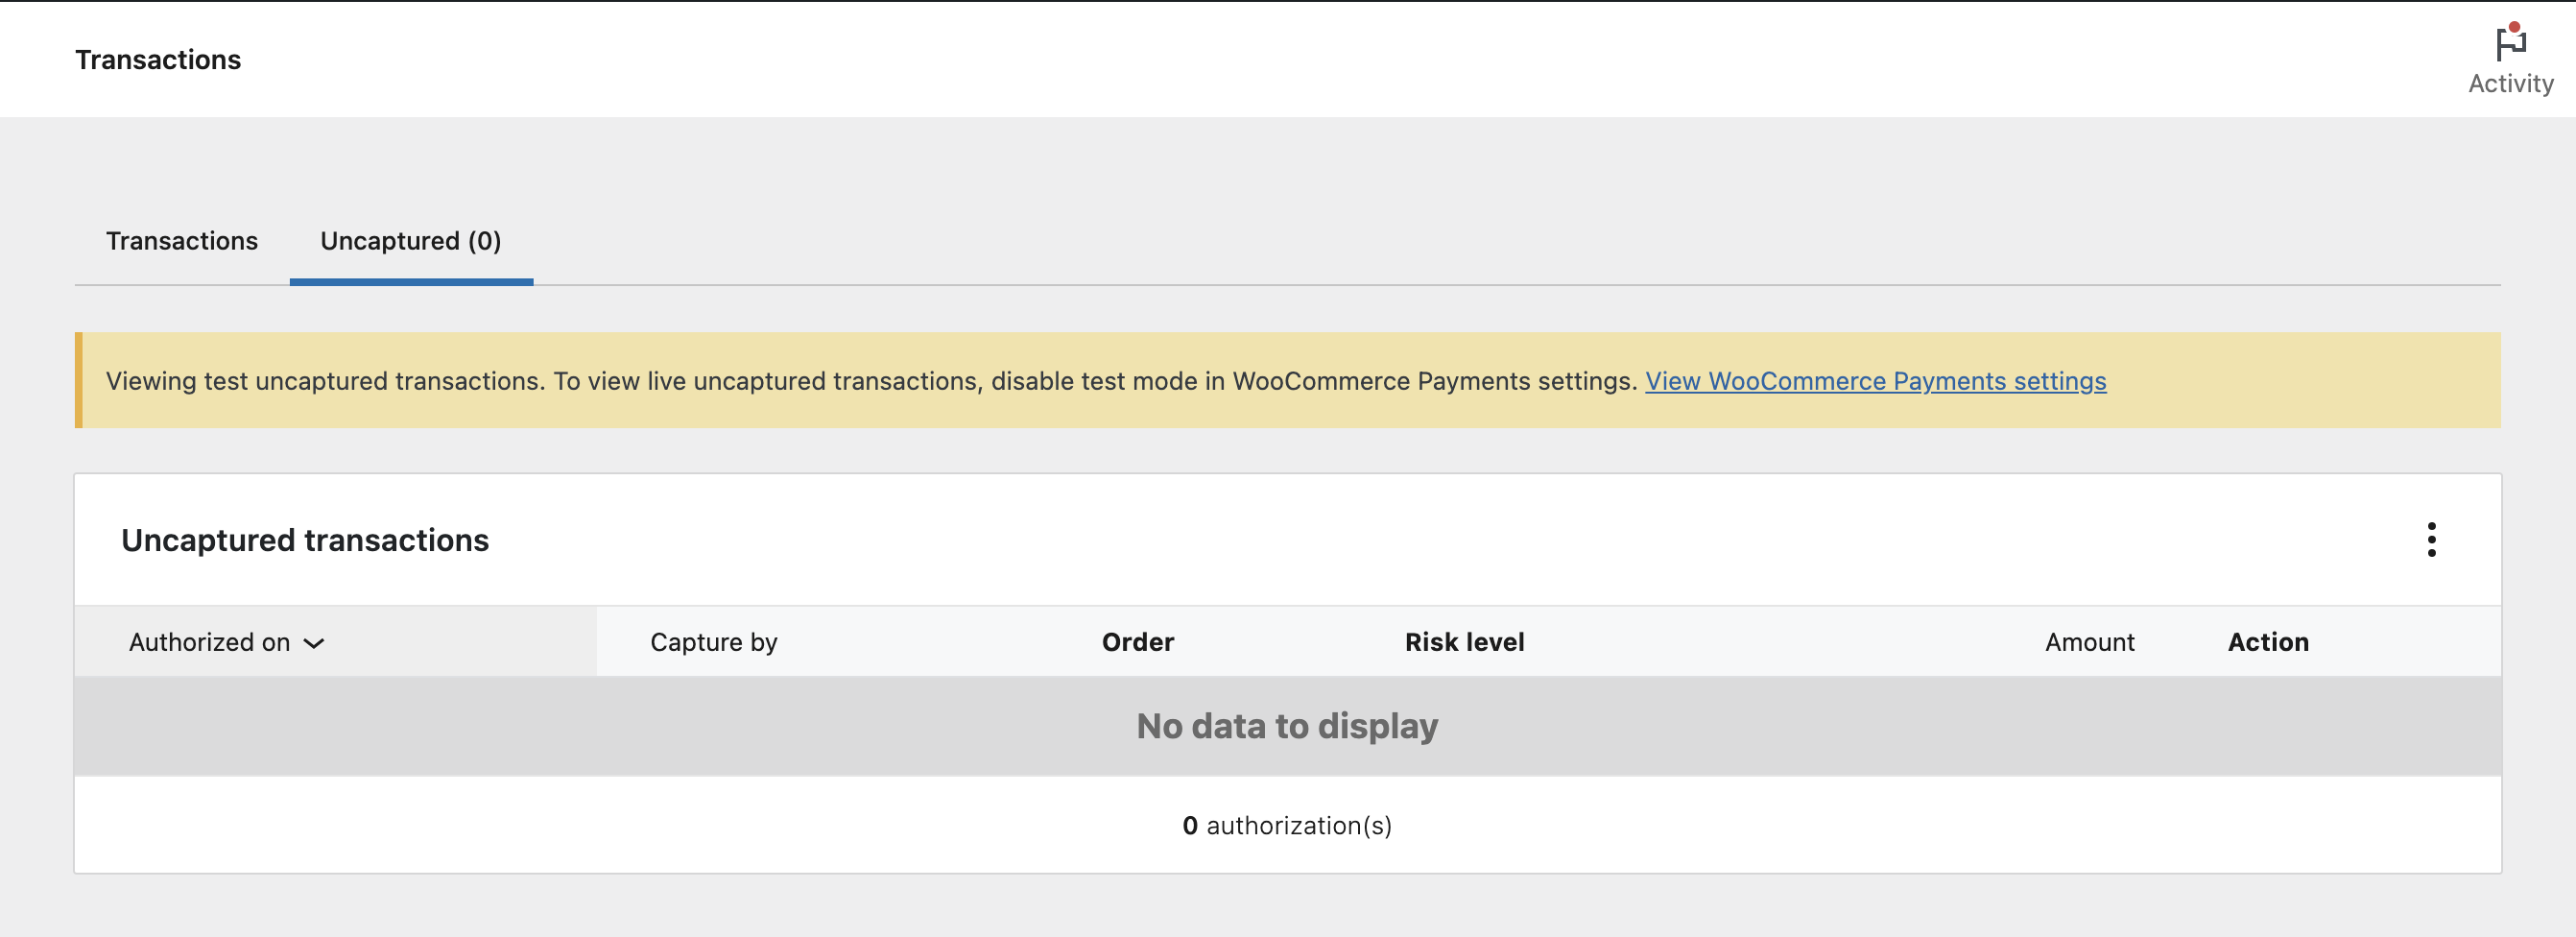
WP Admin > Payments > Transactions. - This page now displays two tabs:
- Transactions
- Uncaptured (0)
- Click on Uncaptured (0) tab.
- The UI will show a loading state.
- After it finishes loading, you'll see:
- Navigate to
WP Admin > Paymentsand disable the settingIssue an authorization on checkout, and capture later(you'll find it at the bottom of the page). - Navigate to
Payments > Transactions.- You'll see that Uncaptured tab is not visible
- Navigate to
WP Admin > Paymentsand enable the setting "Issue an authorization on checkout, and capture later" (you'll find it at the bottom of the page). - As a shopper, purchase at least one order. Make a note of the number of orders you made, and how much did they cost.
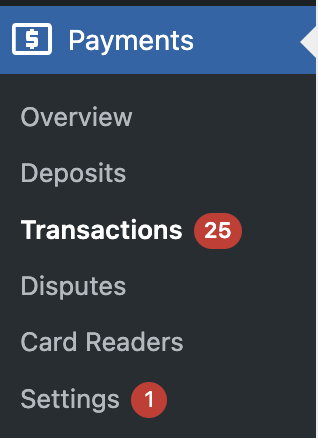
- Navigate to WP Admin. Check the side menu. You should see a badge next to the Transactions link, under the Payments menu.
- This badge displays a number that matches the number of orders you just purchased (i.e. 1):
- Click on
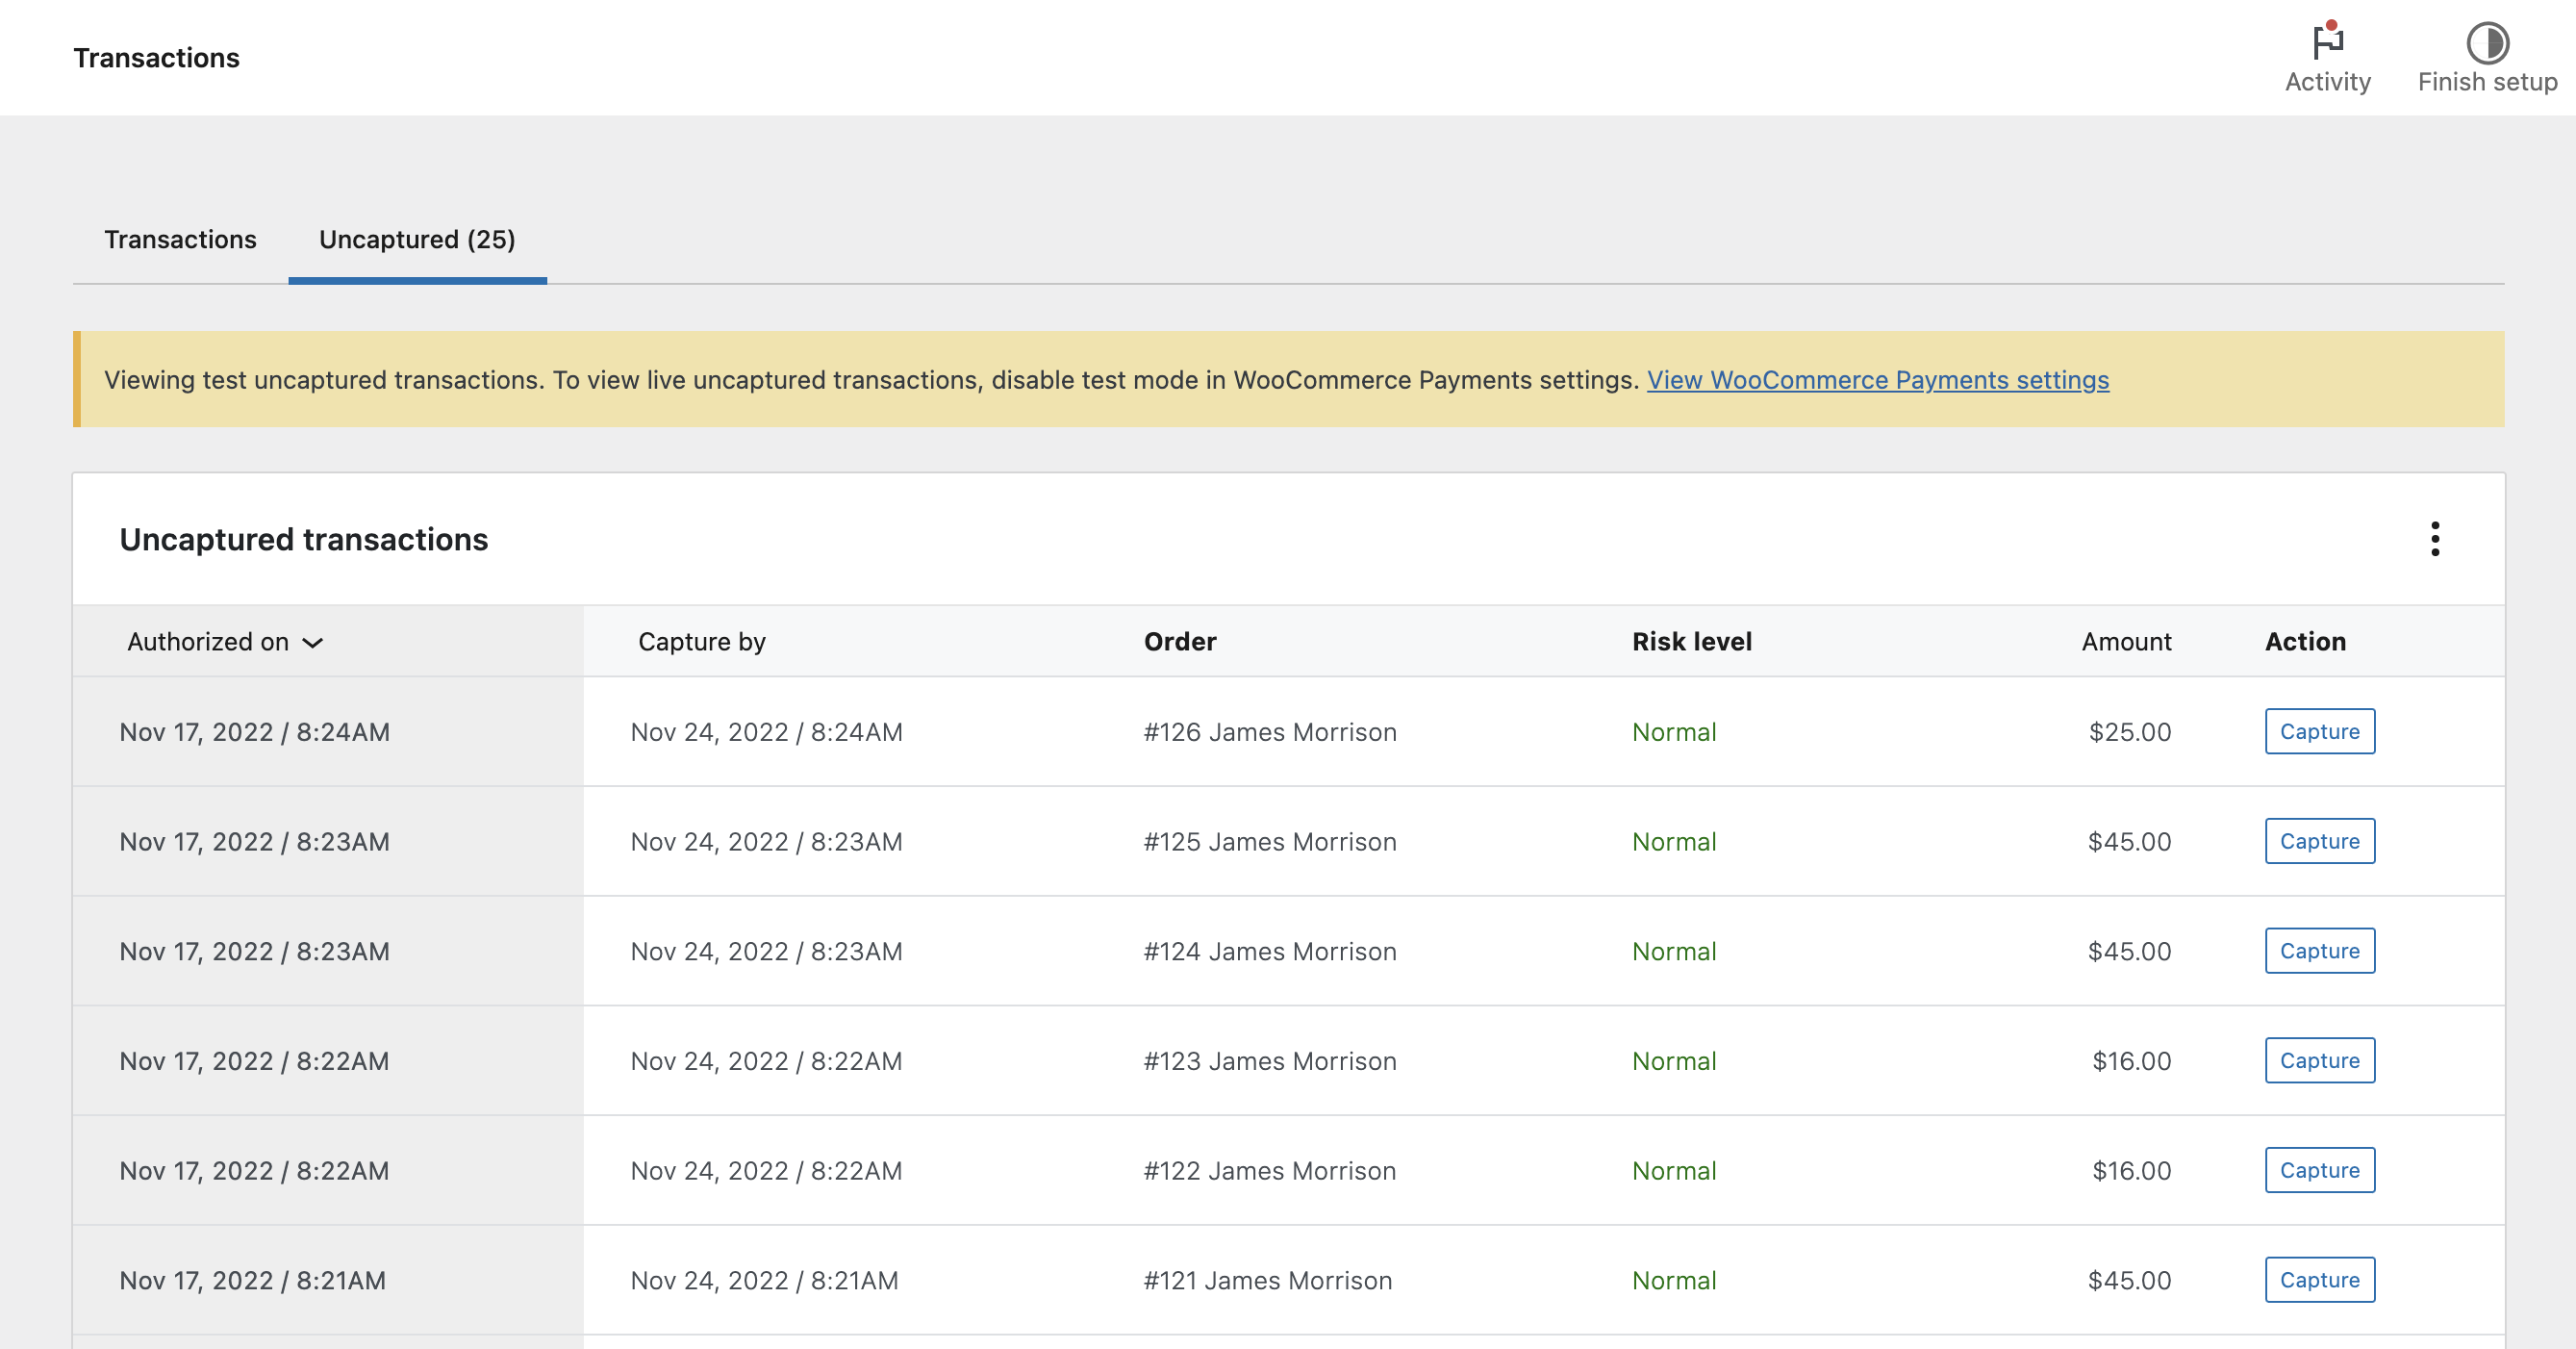
WP Admin > Payments > Transactions. - You'll see that this page now displays two tabs:
- Transactions
- Uncaptured (X) -> X: represents the number of Uncaptured payments, it should match the number of orders you made.
- Click on Uncaptured (X) tab.
- The UI will show a loading state.
- After it finishes loading, you'll see:
- Click on three-dots menu at the header of the table and enable Email and Country, disabled by default.
- Check the Email and Country columns are added to the table.
- Scroll down to the bottom of the table.
- You'll see the information that summarizes the content of the table:
- The number of results. It should match the number of rows in the table, the number shown in the Tab and the number shown in the side menu.
- The sum of all the amounts coming from the amount of each order (money)

- To test the next steps, your test site needs to support multi-currency. You can add a new currency in
WP Admin > Settings > Multi-currency. Look for the button labeled 'Add Currencies' and add a new one. - As a shopper, purchase a new order in the currency you just added.
- Go to
WP Admin > Payments > Transactions. - Scroll down to the bottom of the table.
- Check:
- The number of results. It should match the number of rows in the table, the number shown in the Tab and the number shown in the side menu.
- The sum of all the amounts is no longer visible. This is expected, since we cannot add the amounts in two different currencies.
- Navigate to
WP Admin > Paymentsand enable the settingIssue an authorization on checkout, and capture later(you'll find it at the bottom of the page). - As a shopper, purchase at least 26 orders. Make a note of the number of orders you made, and how much did they cost.
- Click on
WP Admin > Payments > Transactions. - Click on Uncaptured (X) tab.
- The UI will show a loading state.
- After it finishes loading scroll down to the bottom of the table.
- You'll see some pagination controls that allow to navigate the results:
- Page 1 of 2: It shows in which page you are at the moment and two arrows to move to next/prev. page
- Go to page: you can jump to a specific page number using this control
- Rows per page: there is a dropdown that allows to choose the number of results you wish to see per page.

- Using this controls, navigate the results and make sure that the table displays results correctly.
- Click in the order column of row and check that it takes you to the order details screen.
- Navigate back to the Uncaptured tab
- Click in any column of the row except the one that contains the order identifier and check that it takes you to the payment details summary screen.
- Navigate to
WP Admin > Paymentsand enable the settingIssue an authorization on checkout, and capture later(you'll find it at the bottom of the page). - As a shopper, purchase two different orders.
- Click on
WP Admin > Payments > Transactions. - Click on Uncaptured (X) tab.
- The UI will show a loading state.
- Focus on one single row in the table. You'll notice a Capture button in Action column

- Take a note of the order and click on Capture button. Notice the button shows a loading state.
- After a few moments, the table will reload.
- Check that the payment you just clicked is no longer present in the table.
- Check that the total number of payments is updated (one less) at the bottom of the table.
- Check that the total number of payments is updated (one less) in the uncaptured tab.
- Click on Transactions tab.
- Check that the order you just captured is listed in the transactions table.
- Navigate to
WP Admin > Paymentsand disable the settingIssue an authorization on checkout, and capture later(you'll find it at the bottom of the page). - Navigate to
WP Admin > Payments > Transactions. - Check that the Uncaptured tab is still available even you just disabled the setting
Issue an authorization on checkout, and capture later(we don't want the merchant to miss the payment even if they disable it) - Click the Uncaptured tab. Check that there is one authorization listed.
- Click on the Capture button.
- Once the order is captured, check that there is a success message shown at the bottom of the page and check that the Uncaptured tab is no longer visible.
- Navigate to
WP Admin > Paymentsand enable the settingIssue an authorization on checkout, and capture later(you'll find it at the bottom of the page). - As a shopper, purchase an order.
- Click on
WP Admin > Payments > Transactions. - Click on Uncaptured (X) tab.
- Click in any column of the row except the one that contains the order identifier and check that it takes you to the payment details summary screen.
- Check there's a new section below the Payment summary information

- The new section should contain:
- A text that informs the merchant that the payment should be captured before a certain date
- The deadline date. Add 7 days to the order creation date, and the result should match the one you see.
- A button labeled 'Capture'
- Click on the Capture button.
- Check that it transitions to a loading state.
- Verify that there is a message informing the user that the payment was captured sucessfully.
- Verify that the timeline information is updated correctly:
- A payment of $X.XX USD was successfully charged (contains fee information as well).
- $XX.XX USD was added to your Nov XX, 2022 deposit.
- Payment status changed to Paid.
- Refresh the page and check that the counter of pending authorizations is updated correctly in the side bar.
- Navigate to WP Admin > Payments > Transactions.
- Verify that the counter is updated on Uncaptured tab
- Click on Uncaptured tab:
- Verify that the list of authorizations is updated, it should show one less item (the one you just captured)
- Verify that the summary information at the bottom is correct.